Search This Blog

Thursday, May 30, 2013

Makeup Tip #7: Neutralizing Dark Circles

It's a common misconception, not to mention very outdated I believe, that using a yellow or pink based concealer under the eyes to neutralize dark circles is the correct method.  Allow me to introduce you to a little color theory and see if we can't see why this misconception could be what's hampering your ability to look more fresh and awake!

The Color Wheel

First, let's learn a bit about the color wheel.  Did you ever learn about this in school as a kid?  I'm sure you're familiar with the rainbow: Red, Orange, Yellow, Green, Blue, and Purple.  When referenced as bands of light they are next to one another.  In the color wheel, they are in a circular shaped pattern that looks like this:


Making Colors

There are three primary colors: Red, Yellow, and Blue.  These are colors that cannot be "made".  The colors Orange, Green, and Purple are secondary colors, "made" by combining two primary colors together.  Each secondary color has a primary color directly across from it on the color wheel.  These two colors are now called "complementary" colors.


Neutralizing

When you combine complementary colors, you create brown.  Therefore, in order to neutralize one of the colors on the color wheel, you need to mix it with it's complementary shade.  Here's a handy guide:


What Are Dark Circles?

Dark circles under your eyes are caused by a multitude of factors including capillary leakage, excess pigment, hormones, allergies, and dehydration.  The majority of dark circles that women are concerned with covering are due to a combination of these factors, but the coloration of them is what's really important for the sake of neutralizing.  The tiny capillaries under our eyes are from veins, which carry unoxygenated blood.  Blood with no oxygen is blue.  Therefore, the tint these veins give the undereye area is slightly bluish.

As we age, the walls of our capillaries naturally weaken, and microscopic bits of blood begin to leak into the surrounding tissue.  Excess alcohol, smoking, spicey foods, and dehydration can hasten this process and lead to chronic dark circles under our eyes.

Correction

The first step to correcting dark circles under the eyes caused by capillary leakage is to increase your hydration level both internally and externally.  This means loading up on water and eye cream.  Make sure that your eye creams contain ingredients like caffeine or chamomile which will help to flush the excess blood out of the tissues and back into your blood stream.  Vitamin K will also help to strengthen the capillary walls and reduce recurrences.

Now, since we want to neutralize the bluish dark circles, what on our handy color wheel would be the correct color to do so?  Orange!  Or more specifically when dealing with cosmetic colors, salmon.  The slightly more peach toned color will look more natural on the majority of skin tones, although darker skinned women can use a more true orange under their concealer or foundation to neutralize darkness.

Steps To Corrective Color

  1. Start with your eye cream to thoroughly hydrate your under eye area.  Make sure you let it sit for a few minutes to fully absorb.  Pat the area with a single ply tissue to remove any residue that can break down your concealer or corrective color.
  2. Apply your salmon colored corrector to the bluish tinted areas only.  There's no need to cover the entire under eye area.  For most people, this is the ridge on the lower quarter of their orbital bone, in an arc alongside their nose.  Use sparingly and pat the color into the skin with your ring finger.  
  3. Allow to sit for a few minutes and begin to warm up with your body heat.  Pat the area again with your ring finger and then dab any oils from the corrective color up with your single ply tissue again.  This helps the product adhere to the skin more effectively and not slide into fine lines.
  4. Top with your foundation.  When using corrective colors, you need to apply them before the rest of your foundation to ensure that the coverage is natural looking.  If you still feel that you need additional coverage, you can use a tiny bit of concealer over the area, but if you've effectively neutralized the dark circles and then evened out the skin tone with a foundation, this is usually overkill.
What If My Circles Aren't Blue?

Bluish dark circles aren't the only kind, but they are the most common.  Sometimes we also have capillary leakage from arteries, which gives us a reddish tint most people mislabel as rosacea.   If this occurs under your eyes combined with the bluish color, this can create a more purple tone to the area as a whole.  In this instance, yellow would be the more appropriate corrective color.  Other circles are caused by excess pigmentation in the skin, like giant freckles that cover the whole area or panda circles.  These are generally the result of hormone imbalances (like pregnancy) or allergies that cause the body to produce too much melanin (pigment) in a given area.  Since these are already brown, you can't really neutralize them with a corrective color.  In these instances, using a pinkish concealer is ok, given that the majority of them have a brightening agent added as well.  The pinkish hue will brighten up the area and help to reflect light and diminish the appearance of the darkened area.  However, keep in mind that using a much lighter colored concealer will work negatively against you!  Instead of reflecting light, it will give the skin a greyish cast and instead highlight the area you are looking to conceal.  Make sure that you are using a concealer that is the same darkness as the rest of your face for the most natural look.  I also caution you against over powdering the undereyes in any circumstance, as it has a tendency to make the eye area look dry and enhances fine lines.

Here's a handy video I filmed for my YouTube channel as well!  Enjoy!

Wednesday, May 29, 2013

My Favorite Ardell False Lash Styles

I've been a huge fan of the Ardell false lashes for years now.  When it comes to my professional work, this is the brand that I reach for over and over.  The majority of the styles that I've seen are still more natural looking than those with the big thick black plastic bands, because even if they are a thick crazy-ish style of lash the bands on the Ardell lashes are for the most part clear and easily hidden at the base of the real lashes.  While it would be apparent that someone was wearing falsies due to the length, color, or thickness of the lashes themselves, they are still pretty naked to the eye at the base and blend beautifully with the person's real lashes.

I've put together a video showing you my favorite Ardell false lash styles that I use for my headshots and bridal work.  These are also going to be the lash styles that I use on myself for the majority of my videos, unless I'm going for a more dramatic character makeup.  Which honestly, I don't see myself filming until around Halloween time anyway.  I'm more of an "everyday" type makeup YouTube-r.  There are tons of videos out there demonstrating how to blend 18 colors of neon eyeshadow if you want to know how to do the really out there dramatic looks.  But for the most part I make videos for women who come to me and say "I never learned how to do my makeup.  Please help me!"

So if you're interested in wearing false lashes and want a brand that not only looks great but is also easy to find and super affordable, check out my recommendations for my favorite styles from Ardell.  You can find them at Target, Walmart, Ulta, and Sally Beauty as well as many websites such as Madamemadeline.com.  (Madamemadeline.com is where I prefer to buy mine, since there are tons of ways to get free pairs, free shipping, etc.  Plus, when I buy them in bulk, they are cheaper than anywhere else I've found combined with the coupon codes.  I think the code "Falsies" still gives you 8% off.  I've been using it for years.)

Here's the styles that I recommend: #109, #110, #122, Demi Wispies, Demi Luvies, Demures.  I'll also show you in the video what to look for in a good false lash, in case you can't get your hands on the Ardell brand.


Do you wear false lashes?  What's your favorite brand/style?

Saturday, May 25, 2013

Here's to New Relationships!

Wednesday morning I had the wonderful opportunity to meet with the lovely Melody Yazdani of Melody Yazdani Photography and her sister Sarah to do a makeup and hair demonstration for potential upcoming photoshoots.  It's always a little nerve wracking, meeting with a new photographer to show them my work.  It's kind of like a second date.  We've met for coffee, liked each other, and now it's on to see if there's something here. haha.

Thankfully, it all went well, and she posted some of the photos that she took of her sister when all was said and done on Facebook.  I love the lighting of these, and the softness it gives.  Her sister looks fabulous, if I do say so myself, and the red dress looks amazing on her.  They both said they really liked my work, and I'm looking forward to shoots with her in the coming days.

Here's a quick breakdown of the look:

Skin- I airbrushed her porcelain skin, and gave her a tad bit of contouring with LORAC's Tantalizer bronzer and highlighter duo.  I had to make sure I went very sparingly with the contour shade.  Since she's so fair, I had to make sure I was giving her some definition without looking too orange.  I airbrushed a bit back over it to give it the effect of the contour shade peeking through rather than overwhelming the look.  Blush was a quick sweep of Smashbox Blush Rush in Passion very sheerly.

Eyes- I used a palette from Laura Mercier, with a soft shimmery nude all over the lid, matte medium brown in the crease- concentrating the color in a "v" on the outside corner slightly angled up to gift a lift to her slightly downturned eyes, and a shimmery bone color under the eyebrow.  Stila's eyeliner in Lionfish- an amazing shimmery chocolately brown- on the upper lashline and along the outer 2/3 of the bottom lashline.  Lashes and a good coat of Smashbox Full Exposure mascara, and the eyes were done!

Lips- I blended a cherry red lipstick with a soft pinkish nude for a natural looking flush to the lips.  Even though she was wearing a red dress, I didn't want the emphasis to be on her lipSTICK.  I wanted the emphasis to me on her beautiful full LIPS.

Hair- Before I started on her makeup, I set her hair in curls with a 1 1/4" curling iron, clipping the curls to her head to cool.  First I lightly misted some dry oil into the hair and a quick shot of brushable hairspray to give it some hold.  When I was finished, I let the hair down and finger combed the curls.  Her hair was very long, so the weight of it helped pull and soften the curls in the beautiful waves with some bend at the end.

Here are some of the photos of the end result.  What do you think?


Are you local to the Northern Virginia area?  You should really check out Melody's work!  www.MelodyYazdani.com  She offers beautiful contemporary portraits, and hopefully I'll see you sometime there!

Friday, May 24, 2013

Product Review- Femme Couture Get Flawless 8-n-1 Foundation


When I first found this foundation at Sally Beauty Supply back in March (you can buy online at SallyBeauty.com), I was super excited by the claims on the back.  An 8-in-1 foundation?  Sounds too good to be true.  Sadly, it was.

The first time I used it was in my video on How to Apply Foundation with A Foundation Brush.  My initial thoughts on it were great.  I used it over the Too Faced Primed and Poreless primer, applied it with my foundation brush from Crownbrush.com, and all was good.  I only wore it for a few hours, and it didn't irritate my skin.  The finish on it was nice and matte, and the color matched my skin great.  I'd bought two bottles in two different shades, one lighter for my paler days and one darker for when I got a bit more of a tan.  I wish I'd just purchased the one bottle in the lighter shade, but at least I was only out $11.99.

They have a lot of pigment and a nice consistency.  Too bad they make me break out. :(


The second time I wore this foundation was back in April, and I applied it with my blending sponge from Qosmedix.com.  I think that using a damp sponge messed with the formula, because it caused the foundation to make these weird shiney circles on my skin.  Almost like mica flecks.  When I applied it with a brush, I didn't get this issue at all.  I really think it was from the water in the sponge breaking down the foundation somehow.  This doesn't bode well for the wearability of the foundation, especially if I'm going to sweat in the summer!

Later on that I day I went to get a facial, and as she was removing my foundation she noticed I had some irritated red bumps on the apples of my cheeks beside my nose.  I'd felt a little bit itchy there throughout my wedding that morning but hadn't thought anything of it.  Sure enough, once the foundation was removed I had itchy splotches all over my face!  The only thing new I'd used was the foundation, but I didn't want to blame that right away just in case I'd come into contact with something else that was causing the irritation.

I tried the foundation one more time, this time applying it with a brush instead of the sponge.  I didn't get the shiney mica flecks/spots again, but within a few minutes my face started to itch big time.  I took the foundation off right away, and the irritation stopped.


I was really bummed to find that my skin was so sensitive to this foundation, especially since it had done just fine the first time.  The finish with the brush is really nice, and I didn't need to powder.  The lighter color looked like it matched my skin nicely.  Overall, I'm just really bummed this didn't work for me.  It will be going in my "losers" drawer in the bathroom where I stash all the products that didn't work for me.  I'll do some patch tests with a friend or someone else that might like it to see if they have a problem with it.  If not, I'll pass it along to them.  Maybe it will end up in their "winners" pile!

Have you ever tried this foundation?  Did it work for you?  This is the first time that I've ever had such a strong reaction to a foundation before.

**Disclaimer: As with all my product reviews, I was not paid by the cosmetic company to provide feedback or review/promote their products.  All the opinions expressed in this article are my own.  These items were purchased with my own money.

Wednesday, May 22, 2013

Makeup Tip #6: Whiten your eyes!

Copyright Urban Decay Cosmetics


If you've been sick recently, or have liver issues, or just think the whites of your eyes could look a little brighter, you can use this makeup trick to brighten them up without eye drops!

Just like I talked about in Makeup Tip #4, using blue colors will neutralize the look of yellowish whites, whether it's on your teeth or your eyes.  So to brighten up the whites of your eyes, use a deep navy eyeliner.  Dot it between your upper lashes and watch how much whiter your eyes will appear!

Voila!  It's really just as easy as that.  A deep matte navy will look more natural, but feel free to change it up a bit and go with a shimmery blue color, too.  My favorite blue liners are:

1. Smashbox Limitless Eyeliner in Deep Navy  (Matte Navy)


Limitless Eye Liner
Limitless Eye Liner

Limitless Eye Liner by Smashbox is waterproof long-wearing liner that provides bold definition that won't smudge or budge for up to 8 hours.


2. Urban Decay 24/7 Glide On Eye Pencil in Binge (Shimmery Dark Blue)

24/7 Glide-On Eye Pencil

A waterproof eye pencil formulated with moisturizing Vitamin E and natural oils.


What are your favorite blue eyeliners?

**This post contains affiliate links.  Thank you for your support of this blog.

Tuesday, May 21, 2013

100 Day No Buy Challenge


So today I'm starting my 100 Day No Buy Challenge.  I read about it a few months ago on a couple of blogs that I follow, but I wasn't able to really start this until now.  (Can't remember who they were or else I'd totally link and credit them here!  If you're a blogger I follow and you've done this, please comment below so that others can read your challenge, too!)  Just getting back into blogging about makeup versus blogging about weddings for the past three years, the majority of my makeup has been for myself (and the same old routine for years!) or products that I've been using in my kit for years.  Most are limited edition palettes, etc that I buy at makeup shows or online through my pro discounts, and aren't that great for reviewing since it's not like people can go out and buy them anymore.

Enter massive shopping sprees in April and May to stock up on new brands, new products, and trendy items for product reviews and demos.  I've been watching YouTube like it's going out of style, especially the haul videos and monthly favorites.  Anything that seemed to be highly recommended by top gurus and bloggers alike I went out and got for myself to try.  It's been insanely fun to try out things I never thought I'd try (drugstore foundations!), and I've found a few gems I don't know how I lived without before.

Now that I'm fairly certain I've either experienced recently or in the past the vast majority of makeup brands to some extent and their most popular products, I'm going to be writing up a series of articles on my Top 10 Best.... products for the blog.  That being said, it's time I gave my credit card a serious break.  Plus, as my blog is gaining exposure, more opportunities are coming my way to test run products sent to me by brands.  I'm happy to try our free products and offer my honest opinion.  I won't take money for it, but free stuff? Yeah, I'm game.  I don't want to be known as one of those bloggers who only promotes something that's going to give her a kick back if you know what I mean.  Most of my articles I do try to include an affiliate link where the products can be purchased (usually through Ulta), because I do need to make at least some money off my blogging efforts.  As nice as it would be to just buy and try and write all of this for you, I do have bills to pay!  (So if you see something you like, I'd be eternally grateful if you used one of my links to help support my blog!)

But this is kind of all besides the point.  Point really is, I need to stop buying so much makeup or I'll never get in the black with this blog thing.  haha.  So I'm implementing a NO BUY CHALLENGE for myself for makeup, skincare, and haircare products effective today.  Until August 29th, I will not go on any more makeup hauls, skincare hauls, or hair product binges!  Here are the "rules" I've set for myself:

  1. I cannot make any purchases for my own use.  If I need to purchase something to restock my professional kit for work, I can.
  2. Some people had in their rules that they can purchase items that they run out of that they really need.  I think I have enough stuff stockpiled to last me at least the full 100 days.  I have more soap, shampoo, lotions, foundations, etc to probably get me through a zombie apocalypse and keep me looking damn good during it, too.  If I'm not buying, I'm quitting cold turkey.  I'm just an all or nothing kind of gal!
  3. I can still get spa services like mani/pedi's and facials.  If I had to give those up I think I'd lose it.
  4. I will still continue my monthly subscriptions to Glossybox, IPSY, etc.
  5. This does not apply to clothes, although I'm limiting new purchases to my monthly Fashion Challenges so that I don't jump from one shopping habit to another.
That's really all there is to it.  I'm keeping it fairly simple for myself.  I've always been a bit of a makeup hoarder, and I need to force myself to use up the things that I've bought before they go bad and get my reviews written before I go out and buy something new.  The money that I save I'll use to take my husband out for a nice dinner on vacation in August!  I'm sure he'll appreciate both the end to my shopping sprees and the steak I'm sure he'll order.

Monday, May 20, 2013

Product Reivew- Benefit Flawless Face Routine

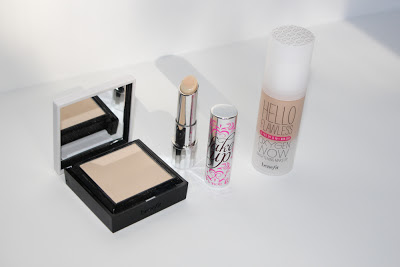
Benefit Flawless foundation powder and concealer

When I know I need to look good and it has to last all day, I reach right for my Benefit flawless face routine.  The Hello Flawless Oxygen WOW Foundation, Hello Flawless Custom Cover-Up, and their newest concealer Fakeup.  I love how the foundation glides over my skin and gives me buildable coverage.  The silicone base also means it will last all day.  This was the first product in this little trio of makeup magic that I tried, and I was instantly hooked. I first talked about it in my March Favorites post and video, and although I've spent the better part of a month trying a myriad of other foundation brands, this one still stands near the top of my list.

Benefit hello flawless foundation powder and fake up concealer swatches
Swatches of the foundation, powder, and concealer. They look a tad orangey and dark on the back of my hand, but they look much better and more natural on my actual face.  My hand is a lot paler than my face most of the time.


Then when I went on my first Ulta Makeup Haul, I bought the matching powder.  I love that they have shades that automatically coordinate.  It makes buying products that work together so much easier.  Formulas that are meant to work perfectly together and have the same shade name= goof-proof buying!  My only negative comments would be to ditch the little brush that comes in the compact.  I think it's a little useless.  A big fluffy powder brush is going to give you a much better light dusting than the flat one.  I really like the sponge for pressing some powder under the eyes to set the concealer or around my nose for extra oil absorption.

I also bought the Fake Up concealer back in March, and although at first I wasn't a huge fan I learned to love how hydrating it is under my eyes.  Still not the biggest fan for it in other areas of my face, so I use a drier concealer still to cover blemishes.  (Blemishes and scar tissue have a different texture to their surface, and a really emollient concealer can slip right off.  Drier concealers are better for covering these.)  I've also used their Boi-ing Concealer and Erase Paste, and they really rock, too.  I use them from time to time under my eyes, but the Fake Up's moisturizing properties seem to be the best choice for my personal needs.

Not to sound like I'm typing up a huge ad for the Benefit products, but these really are some of my favorite "basic face" products I've come across.  Tomorrow I'll be filming my first flawless foundation routine video to post on Thursday, and these are the products I'll be featuring.

From the brand:

Foundation-
Hello...it's flawless time! Our new oil-free brightening liquid foundation builds from light to medium coverage for a natural complexion you can believe in. It's you...just more luminous & healthy looking.

Find your flawless match with the hello flawless oxygen wow shade guide in Beauty School.

 WHAT ELSE YOU NEED TO KNOW:
  • broad-spectrum SPF 25 PA+++ protection**
  • oil-free formula
  • natural finish
  • hydrating benefits
  • light-diffusing properties
  •  available in 9 shades
Powder-

Why we love it!

Say "hello" to flawless NEW packaging! Now in an improved magnetic-close compact, this famous powder cover-up glides on naturally sheer and layers beautifully for customized coverage. Perfect for any skin type, the silky formula comes with a newly designed brush AND a sponge for any degree of coverage you desire.

 Concealer-

Why we love it!

Cover-up goes incognito! This hydrating crease-control concealer - with Vitamin E & apple seed extract - hides dark circles & diffuses fine lines for a silky smooth, ultra-natural look. Available in three shades, it’s proven to keep skin hydrated for 6 hours!* *Instrumental test
WHAT ELSE YOU NEED TO KNOW:
Results too good to conceal!
  • 100% said fakeup hydrates skin*
  • 100% said fakeup feels comfortable on skin*
  • 100% said the texture feels silky*
  • 94% said the effect is long-lasting*
  • 94% said fakeup doesn’t run*
  • 97% said the formula is lightweight*
  • 91% said fakeup conceals dark circles*
  • 91% saw a natural appearance*
  • 97% said the packaging makes it easy to use*
*Results observed in a consumer panel survey. See fakeup in action NOW!

What do you think of Benefit's products?  Have you tried any of these items?  Do you love them as much as I do?

**Disclaimer: As with all my product reviews, I was not paid by the cosmetic company to provide feedback or review/promote their products.  All the opinions expressed in this article are my own.  These items were purchased with my own money.

Sunday, May 19, 2013

Wizard of Oz Photoshoot

So I turned 30 last week, and I got to spend the morning doing two of the things in my life that make me the happiest- spending time with my husband and being creative on a photoshoot!  Jacob got to come with me for once and got a glimpse into what I do on set, and he actually ended up being such an amazing help everyone was commenting what a lucky gal I am!

The theme of he shoot was Wizard of Oz, one of my favorite movies of all time.  That moment when the screen changes to a world of color gets me every time.  I can only imagine the magic and wonder of the viewers all those years ago seeing it for the first time in a theater. 

Here's a sneak peek at one of the shots the photographer sent to the cast and crew, and I can't wait to see the rest.  She says it will probably take her a few months to get through the edits, and I'll be sitting on pins and needles until then.

Photo by Traci Books Photography


The shoot wasn't styled to be a literal interpretation of the movie, but more of an inspired look.  Glinda wore a giant white tulle wedding dress, and the Wicked Witch wore a tulle skirt and leather bustier!  I loved the glittery red ballet slippers worn by Dorothy, a ballet dancer who modeled the look for us.  My overall favorite though was my Lion.  Not only did the model entertain us during the getting ready process but her look was my favorite to do.  I got to get a bit more creative and go outside the lines a bit.  I tend to favor a more "pretty" look for even the creative projects rather than the real avant garde looks, so most of the time I'm not going to go too crazy on shoots.

What do you guys think?  Who's your favorite character from the Wizard of Oz?

Friday, May 17, 2013

Product Review- Lorac Pro Palette with Swatches

Lorac Pro Palette eyeshadows


I remember back when the PRO Palette Eye Shadow Palette first came out, all these people were talking about how amazing it was.  And then suddenly all the hype died off and there wasn't much about it anymore.  It took me a few months to get the palette and then another few months before I started to use it, but I'm so glad I finally tried it out.  It's quickly become a staple in my boudoir kit for its versatility.  (Major bonus, it comes with a little travel size of their amazing eye primer, too!)

Lorac Pro Palette eyeshadow colors


The top row of shadows are all matte, and the bottom row are all shimmer shades.  I think this is genius, because you don't always want a heavy shimmery eye or an all matte look, and this allows you to mix it up with both the lighter neutral shades and the darker shades.  You can create almost any type of eye look with this (minus something colorful of course).

Lorac Pro Palette eyeshadow matte shades


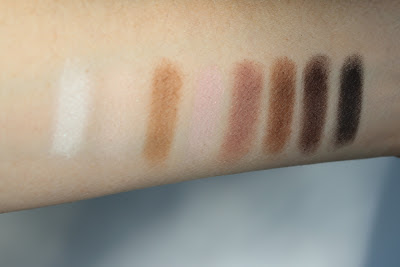
Here are swatches of the colors on my forearm, which by me being super pale is almost like seeing them on white!  So go pale for once.  I guess it's helpful sometimes, lol.  Top row are the mattes: White, Cream, Taupe, Light Pink, Mauve, Sable, Espresso, and Black.

My only complaint is that cream is actually a little on the pink side rather than a real "flesh" tone, so it's hard to do a true nude contoured eye for us pale girls.  And Light Pink is a little more on the bubblegum end of the scale.  I'd like to see a flesh tone closer to MAC's Orb.  I have Orb so I can always use that, but that requires carrying another palette of shadows, which defeats the purpose of having such a versatile palette already together for me.

Sable is a really pretty shade in my brows, since it's a very warm reddish brown.  It's super pigmented, so just a tiny touch of it is plenty.  And I absolutely adore that they put the black as one of the mattes.  That makes it so versatile for deepening a lashline or a crease without adding shimmer!  Yay Lorac!

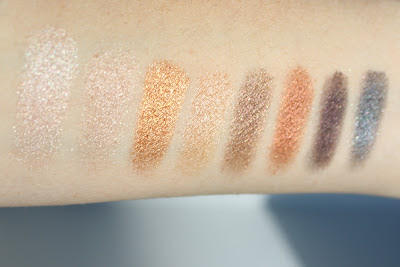
Here are the swatches of the bottom row, the shimmers: Nude, Champagne, Gold, Light Bronze, Pewter, Garnet, Deep Purple, and Slate.

Lorac Pro Palette eyeshadow shimmer shades


I don't think there's a single color on this row that I'm not completely in love with.  Champagne is so drool worthy, and Slate is so nice for brightening up the eyes while still going smokey.  The bluish tones to it make the whites of your eyes look whiter.

Have you tried the PRO Palette Eye Shadow & Mini Behind The Scenes Eye Shadow Primer?  What's your favorite color?  Leave me some feedback below!  And if you have done a video or blog post about this product, feel free to share your link with everyone!

**Disclaimer: As with all my product reviews, I was not paid by the cosmetic company to provide feedback or review/promote their products.  All the opinions expressed in this article are my own.  These items were purchased with my own money.

Thursday, May 16, 2013

Massive Makeup Haul- Target, Ulta, Sephora, and MAC

This past weekend I went on a massive makeup shopping spree to Ulta, Sephora, MAC, and Target, and I got a ton of products to review for upcoming articles here on the blog.  I want to put together some awesome Top 10 lists on categories like foundations, mascaras, lip products and more, so I knew I needed to have a comprehensive knowledge of the many options out there available.

I'm not going to go into reviews of all of the products that I purchased, as this would be the never-ending blog post if I were to do that.  As it stands, I had to film four different haul videos to get everything up on my YouTube channel!  I'm uploading the first one as I type this, and of course it's super late in the evening because we lost internet for about 3 hours earlier right when I was getting ready to post today's blog.  I probably should have typed this up this morning before starting filming, but I was enjoying my day to sleep in while hubby-wonderful took the boys to school.  (He's seriously just the BEST.)

But here's a rough breakdown of what I got at each place accompanied by photos!  Yay photos!  Make sure you leave me lots of comments below on what products you want to see featured here on the blog or in a video, and of course your recommendations for products I should try before putting together my Top 10 lists at the end of the month.  And of course, when it's done uploading you should check out my first video on my items from Target!  (I'll update this post with links to the other videos as I upload them over the next two days, too.)

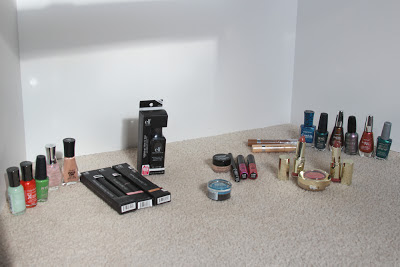
Target Makeup Haul Shopping

Target:
Sally Hansen Lustre Shine- Lava
Sally Hansen Lustre Shine- Copperhead
Wet-n-Wild Fast Dry- Gray's Anatomy
Wet-n-Wild Wild Shine- Caribbean Frost
NYC Precious Peacock
NYC Highline Green
Sally Hansen Hard As Nails- Mint Sorbet
Sally Hansen Hard As Nails- Crushed
Sally Hansen Insta-Dry- Quick Sand
Sally Hansen Crackle- Wave Break (over Mint Sorbet)
Sally Hansen Diamond Strength- Aisle Be There (also swatched over Essie Cascade Cool)
NYX Full Coverage Concealer in Porcelain
NYX Glam Lipgloss Aqua Luxe in Velvet Rope
NYX Glam Lipgloss Aqua Luxe in Glitter Dreams
NYX Glam Liner Aqua Luxe  in Glam Golden
Milani Lipstick in Dulce Caramelo
Milani Lipstick in Nude Creme
Milani Baked Blush in Coralina
L'Oreal True Match Super-Blendable Crayon Concealers in W1-2-3 Fair/Light and N6-7-8 Medium/Deep
e.l.f. Studio Makeup Mist & Set
e.l.f. Studio Lip Balm SPF 15  in Pink
e.l.f. Studio Volume Plumping Mascara
e.l.f. Studio Lip Definer & Shaper
Maybelline  Eye Studio Color Tattoo Eyeshadow in Tenacious Teal

NYX concealer liquid eyeliner aqua luxe lipgloss

e.l.f. mascara lip balm lip pencil setting spray

milani lipstick baked blush

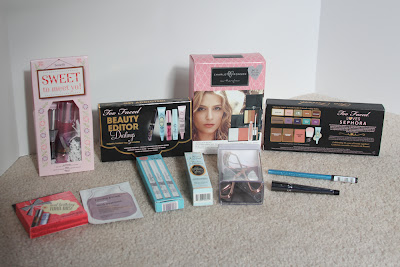
Sephora:

sephora makeup too faced eyeko benefit tweezerman charlotte ronson

FREEBIES- 500 Point Perk set from Benefit and birthday gift along with a Living Proof hair mask sample
Eyeliner Trio by Eyeko
Too Faced Shadow Insurance Glitter Glue Eye Shadow Primer
Tweezerman Lash Curler
Sephora Liquid Eyeliner in Black
Sephora Flashy Liner Waterproof in Flashy Blue
Too Faced Loves Sephora Set
Charlotte Ronson On-The-Glow Kit

MAC:

MAC Prolongwear foundation pigment in tan Fix+ concealer

I only purchased four things from MAC, but compared with everything else I got I didn't need much!

Products:
MAC Prolongwear Foundation in NC25
MAC Fix+
MAC Pigment in Tan
MAC Select Moisture Cover in NC20

Ulta:


Products:
L'Oreal Infallible Makeup SPF 18 Foundation in 602 Soft Ivory
Revlon Photo Ready Makeup SPF 20 Foundation in 002 Vanilla
Revlon ColorStay Makeup for Normal/Dry Skin SPF 15 Foundation in 180 Sand Beige
L'Oreal Revitalift Miracle Blur Instant Skin Smoother
L'Oreal True Match Super Blendable Concealer in W1-2-3
Revlon Photo Ready Concealer in 001 Fair
L'Oreal Infallible Eyeshadow in Endless Sea and Endless Pearl
Ulta Super Blender Sponge
Nivea Lip Butter Caramel Cream Kiss and Lip Butter Vanilla & Macadamia Kiss
Nivea Natural Volume Lip Care
Maybelline Eye Studio Master Precise Ink Pen Eyeliner in Black
Essence Super Fine Eyeliner Pen in Black
Maybelline
Eye Studio Master Shape Brow Pencil
in Soft Brown
L'Oreal Color Caress Wet Shine Stain in Pink Rebellion
Maybelline Color Sensational Color Whisper Lipcolor in Cherry on Top
Revlon ColorBurst Lipgloss in Hot Pink Rose and Crystal Water
Revlon Color Stay Overtime Length Waterproof Mascara
Cover Girl Professional Super Thick Lash Mascara
L'Oreal Double Extend Lash Boosting Mascara
Maybelline Full & Soft Thick & Healthy Waterproof Mascara
Covergirl LashBlast Fusion Mascara
Revlon Lash Potion by Grow Luscious Mascara

As you can see by recurring brand names, L'Oreal, Maybelline, Revlon, and Covergirl had buy one get one half off on a lot of their items, or else that'd be way more money I'd have spent.  Thankfully, I plan when I shop to take advantage of their awesome sales and use my accumulated points for dollars off my total!

Phew!  That was a lot to type up!  Now I'm off to bed before doing a wedding in the afternoon.  Hopefully I've learned my lesson and will type up tomorrow's blog when I get up instead of trying to hope the internet doesn't fail in the evening when I get back from DC.

Don't forget to leave me some feedback on what products you want to see featured and products you think I need to try before I make my Top 10 Lists!

Related Posts Plugin for WordPress, Blogger...