Search This Blog

Showing posts with label makeup application. Show all posts

Tuesday, April 30, 2013

Makeup Tutorial- Jessica Alba Kid's Choice Awards Look


Before I moved I filmed about 10 videos I'd planned on uploading once a week or so while we waited for the new house to be finished being built. (Seems like my whole life is revolving around this house right now!  I can't wait for it to be finished so I can get my studio all set back up again finally.  I feel like my life is incredibly boring without meeting with clients every day lately.)  But then we moved, and I couldn't find the cords for my computer.  All the videos were on the hard drive, and now that I've finally gotten it all back together I can pull those files off an upload them!  Yay!


Here is the first of my celebrity tutorials- Jessica Alba from the Kid's Choice Awards.  It's a gorgeous glowing look (I mean seriously, is she ever not glowing and gorgeous?) with soft rosy cheeks and beautiful deep teal eyeliner.  I added a bit of sparkle with a line of glitter eyeliner over the top, just for a pop of fun.  I really hope you enjoy it!  Teal liner is really really in for summer, and although this is a bit more on the emerald end, you can definitely switch it up with a more blue shade.

What trend will YOU be rocking this summer for a hot date?

Products Used or Shown:
Elf Blushed and Bronzed
Clinique Blush in New Clover
Stila Waterproof Liners in Peacock and Starfish
Stila All Over Shimmer Liquid Luminizer
NYX Glitter Liner in  #110 Crystal Jade
MAC Eyeshadows in Orb, Gesso, and Kid
Bite Beauty Lipstick in Musk
Victoria Secret Lipgloss in Mocktail Hour
L’Oreal True Match Lumi Foundation in W 1-2

You can view my other videos here:
HOW TO APPLY FOUNDATION WITH A BEAUTY BLENDER STYLE SPONGE- http://www.youtube.com/watch?v=fOS4HMvHzWI
HOW TO POWDER UNDER YOUR EYES- http://www.youtube.com/watch?v=wXUVN7duRbo
HOW TO APPLY POWDER TO SET YOUR FOUNDATION- http://www.youtube.com/watch?v=RDatlnwGArs
HOW TO CONTOUR AND HIGHLIGHT YOUR FACE- http://youtu.be/6syRC94ex7I
HOW I FILL IN MY EYEBROWS- http://youtu.be/M7TENQirOLI

Tuesday, April 23, 2013

Makeup Tip #2!

***Here is the second post that should have gone live yesterday!  Today's post coming later this afternoon!***

Today's makeup tip can also be applied to doing your nails, too!  Whenever you want your color to pop and be really vibrant, start with a white base.

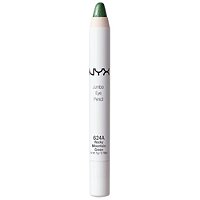
For eye makeup:  Use a white cream color on your eyelid and then pat the brighter color over the top for the most impact.  This works especially well for loose pigments, as the cream give the loose powder color something to stick to, and the white eliminates any skin color that could dull down the vibrancy.  You can use a cream color in a jar or pot or a convenient stick, like the NYX Jumbo Eye Pencil in Milk.

Jumbo Eye Pencil


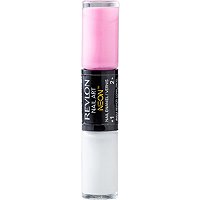
For nails:  If you're doing a bright color, especially a neon (which is so in for spring!), coat your nails with a white nailpolish first.  Once that's dry, put on two coats of your favorite color and watch how bright it appears!  Revlon even sells dual ended nail polish duos that have a white base color and a neon color in the same container for your convenience- Nail Art Neon.

Nail Art Neon

Monday, March 18, 2013

Product Review- Tarte Amazonian Clay 12 hr Blush


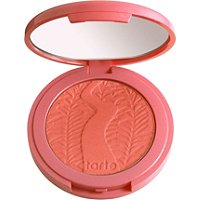
Tarte Amazonian Clay Blush Review


Amazonian Clay 12 Hour Blush


From the company:

A long-wearing, supremely soft blush infused with Amazonian clay harvested from the banks of the Amazon River and naturally baked by the sun.
Product Performance: This 12-hour blush universally benefits all skin types for a fade-free, flawless finish in shades ranging from soft to vivid and matte to shimmer to suit a wide variety of skin tones.
Powered By: Amazonian clay minimizes oil in and around pores to balance skin and keep product in place while also hydrating the skin naturally to restore moisture, reducing the appearance of dry, flaky skin.

And now for my $.02:

Let me start off by saying, nobody from Tarte paid me or asked me to do this review.  I bought their Amazonian Clay 12 hr Blush in Blushing Bride last fall all on my own, with my own dollars.  I bought another kit from them that had a travel size of a color called Adventurous (which I will cry when I run out of b/c they don't sell it on it's own!).

Copyright Tarte Cosmetics.  This is a screenshot from their website of the Blushing Bride Color.


That disclaimer out of the way... I LOVE THIS BLUSH!  I really love the Adventurous color a lot better than the Blushing Bride color, but it's still a really great product and can be totally wearable even on my super pale skin.  When I want a more mauve/wine based color for a bit more drama, or I'm wearing cooler tones for my outfit and makeup but don't want to reach for a really Barbie-pink color, the Blushing Bride looks great.  I love how it has some soft golden shimmer to it.  However, Adventurous is way more my speed- the perfect blend of peachy pink with a non-glittery glow.

Amazonian Clay 12 Hour Blush
Click to shop

The 12 Hour Claim:

I find that this product goes on beautifully and really holds up to it's claim of 12 hours of wear.  It actually lasts longer than that on me, as I am often putting on my makeup in the wee hours of the morning for weddings and hitting the hay after midnight.  Can't say I'm totally stunning at that witching hour, but it's definitely better than 12 hours.  I do wear a high quality foundation (most times over a high quality makeup primer like Makeup Forever HD Primer), so I'm sure that helps with staying power vs applied over cheap foundation or just a powder.  No matter how good a product is, you have to give it something to grip to!

Copyright Makeup Forever from the Sephora website.


My favorite thing about these blushes, other than the fact that they wear so well, is that the case color matches the product color. Ingenious!  I don't know why more cosmetic manufacturers don't do this!  It's really such an amazingly simple idea, yet it makes it so nice for when I'm looking for exactly the color I want.

Watch my YouTube review video for more about why these blushes rock!  Looking to add some Tarte products to your makeup bag?  SHOP HERE and don't forget to sign up for their Pretty Perks program to earn great rewards for shopping online and FREE SHIPPING on orders of $40 or more!


Saturday, March 16, 2013

How To Contour And Highlight Your Face

For this tutorial, I used powder products to contour (add shadows) and highlight (bring forward) my face.  I like using powder products, because I prefer to set my foundation after applying with a loose hydrating powder.  My favorite is Smashbox Halo Hydrating Perfecting Powder.  You could use a cream or liquid product to add your contour and highlight prior to your foundation for a more natural look or after the foundation for a stronger look and then add your powder over the top.

Products Needed:

*Too Faced Chocolate Soleil Bronzer- a matte dark bronzer with a delicious chocolate smell!
*Stila Eye Shadow in Kitten- careful this color is very very shimmery so use sparingly!
*Real Techniques Contour Brush
*Real Techniques Setting Brush
*Crown Brush IB106 Angle Blush Brush- from their Italian Badger line

Step 1:
* After you apply your foundation (watch how I apply it with a Beauty Blender™ style sponge here!), concealer, and powder, dip your angled blush brush into the bronzer and apply it under the cheekbone from the back of your cheek forward. Stop it just below the apples of your cheeks.  Repeat on the other side.  (Check out the video to see how I hold the brush and how to find where the perfect placement for your contour shade.)

Step 2:
* Using your angled blush brush, apply the bronzer at the temples and along your hairline to give some dimension to your forehead.  This will make the center of your forehead look brighter without having to apply a shimmery highlight in your t-zone, which could make you look oily or shiney in photos.

Copyright Too Faced Cosmetics. Image from the Sephora website.

Step 3:
* (Optional) Using the setting brush, apply bronzer in a narrow line down the sides of the nose to make it appear thinner.  Be sure not to take it all the way to the tip of your nose, or it could look dirty.  Blend it out very well so it's just the hint of a shadow and not a dark obvious line.

Step 4:
* Swipe the contour brush over Kitten and tap the excess.  Apply the highlight over the top of your cheekbones from just before the temples to just over the center of the apples of your cheeks.  Do this for both of your cheekbones to highlight.

Step 5:
* Without adding any more product to the brush, swipe the brush in a "C" shape over the outer edge of your eyes to bring a touch of radiance to your eyes and really bring out this area of your face.

Step 6: 
* Use your setting brush to get a very tiny bit of Kitten on the tip of the brush and swipe it down the center of your nose and over the bow of your lip.  Make sure to blend away any edges with your fingertip so there is no obvious makeup here.  You just want it to catch the light a bit and add a glow, not a frosted stripe.

Step 7:
*  If you need to tone down any of your contouring or hightlighting, use your buffing brush to soften the edge with a bit of your face powder.

Step 8:
* Don't forget to add some color to your cheeks!  Even if you don't want a real "pink" or "peach" color to your face, you should use a blush to blend the area between the highlight and the cheekbone together.  You can always try a very nude color with a hint of brown to it for a very "no makeup" look, but honestly I prefer something with a touch of pink.  Nobody's face is completely devoid of natural flush, so eliminating it has the tendency to make it look very unnatural.

Tuesday, March 12, 2013

How to Powder Under the Eyes and Around the Nose

Keeping your concealer from creasing under your eyes can be a major headache for some people.  Not only do you need to find a product that doesn't move and still gives you the right amount of coverage, you can't go and ruin that by applying your powder incorrectly.  Even if you don't have the perfect product, knowing how to powder it can at least give you better staying power until you do find that perfect product for you.

Personally, I love the Maybelline Instant Age Rewind Eraser Dark Circle Treatment Concealer.

Then, I set my concealer with loose powder. Smashbox's Halo Hydrating Perfecting Powder is great because it works to hydrate the skin throughout the day, so it won't dry out your under eye and make it look more creased.  You can purchase both of these products at Ulta.  If you don't have an Ulta near you, the Maybelline products are available at any drugstore, and Smashbox is available both online and at Sephora.


Step by Step:

  1. After you apply your concealer to your undereye area- Take a two-ply tissue and peel it apart so that you are left with an even thinner piece of tissue, and then wrap it around your ring finger.  Use that finger to gently pat away any excess pigment and oils from the products.  Once the concealer has been warmed up by your body, the concealer can move, so this takes away an extra that can settle into the fine lines and look cakey.
  2. Dip your small fluffy brush into your loose powder and shake the excess off.
  3. Lightly run the brush under the eye area to add some of the powder to the concealer and set it into place.
  4. Lightly run the brush around the sides of the nostrils, upper lip, and your bottom lip to set any concealer you may have placed there.  The small brush will also allow you to target these smaller creases a larger traditional powder brush would miss.
Check out the video I filmed for my YouTube channel here!

Products used in this video were:

*Smashbox Halo Hydrating Perfecting Powder in Fair
*Real Techniques Setting Brush

Monday, March 11, 2013

How To Apply Foundation With A Beauty Blender Style Sponge

I never used to use sponges for anything other than applying moisturizer to clients before putting their foundation on.  I certainly never used them on myself, and I always saw them as a disposable product necessary only for sanitation needs in a professional environment.  Having worked for makeup counters for so long, I was a firm believer in applying foundation with a foundation brush and a foundation brush only.  Even after I discovered the world of airbrush makeup, I still put my own foundation on the traditional way day in and day out.

Then I discovered the "beauty blender style sponge".  The original is called the

Beauty Blender™.  It came out a few years ago, but I never paid much attention to it.  I got one as a gift from someone once and didn't even take it out of the package.  Through some industry friends, I found out about a generic version online from Qosmedix.com, and I decided to buy a few (since they are only about $2 a piece there) for friends and stick them in with the makeup gift baskets I'd made for them that Christmas.  I had an extra one laying around for myself, and this past October I tried it out for the first time.  I wasn't impressed.  But little did I know, I was using it incorrectly!  The most important thing to remember is to use it wet, and use it to dab the makeup on the surface of the skin!  It made all the difference in the world.  Now I don't use anything else to apply my foundation, and it's changed the way my makeup wears on my skin for the better.

Here's how I compare the "original" to the "generic" version:
* The generic version has an indent in the center of the egg shape which makes it perfect for blending and softening out the edge of your makeup around the jawline and smoothing down the sides of the nose.
* The generic version is available in either pink (perfect for girly girls) or black (which doesn't exactly hide the dirtiness the way you'd think).  Either color will have some staining that even the amazing original Beauty Blender™ sponge cleaner can't remove.  Once the sponge starts to break down and not work well, it's time to toss it, but with regular cleaning, you can reuse it over and over and over!
* The generic version is sooooo much cheaper!

Copyright Qosmedix.com Oblong Blending Sponge, Pink

Now for the Step by Step to applying your foundation with the sponge:


  1. Wet your sponge thoroughly with water, then squeeze out as much as you can.  The sponge will swell to twice it's size and give you ample surface area to apply your foundation with.
  2. Apply your moisturizer and primer to the skin and allow it to sink in.  In my YouTube tutorial, I used Ren Ultra Moisture Day Cream and Smashbox Photo Finish Hydrating Primer.
  3. Apply some foundation to the back of your hand and dip the flat "butt" of the sponge into the foundation.  I used Benefit's "Hello Flawless!" Oxygen Wow Liquid Foundation in Ivory.
  4. Start in the center of your face to the side of your nose and start patting the foundation onto the surface of the skin.  Work your way to the outside of your face, applying the foundation in areas where you need the most coverage.
  5. Use the pointed end to smooth out any edges under your eyes and around the nostrils and the indented side to smooth out the edge around your jawline and down the sides of your nose.
And there you have it!  Beautiful, natural looking foundation!  Be sure to watch my Tutorial on how to use the sponge as well as the other videos in my "Basic Face Series" on YouTube which covers getting the perfect canvas for your makeup application.  Don't forget to like the videos and subscribe to my channel to see more great tutorials and product reviews!

Sunday, October 24, 2010

Tarte Smooth Operator Illuminating Serum

Being a professional makeup artist sure has its perks.  First, I get a tax write off on all the makeup I buy as business supplies, so it gives me the opportunity to try out all sorts of new stuff.  Second, with as much makeup as I have to buy to simply replace the makeup in my kit I use on shoots and weddings, I rack up a lot of membership points at Sephora and Ulta.  Sephora has a program called V.I.B., Very Important Beauty (Insider).  I get exclusive emails with discounts and promotions, and every year on my (Free) renewal date, I get a coupon for 10% off.  With this year's discount, I bought a set of "Sephora's Favorites- Glizt & Glam Collection" and in it got a lot of great kit-sized products to test out.  I tried a few of them out this weekend at a wedding and was super impressed by Tarte's Smooth Operator Illuminating Serum, an new product that's only available right now as a part of the set or as a part of Tarte's Radiant & Rested Luminous Complexion Collection.  It's so smooth and silky feeling, and it has a bit of a tint to it,so it really helps to even out skin tone either alone or under foundation.  It says there's a bit of a glow to it, but I didn't really see much pearly glow as an evening of the skin.  I think it's best for clients with fair skin, as on darker skins it might look chalky.  But it made a super amazing base for a client with a large red cluster birthmark on her right cheekbone above her eye.  It helped grip the concealor and added a bit of coverage on it's own. Then with the airbrush over the top, you couldn't even see it any more.  I just ordered the R&R complexion set with my Sephora Friends and Family discount code (Available from now until Nov 3, use promo code FF2010 for 20% off!) for the full size product.  I'm also excited to try the EmphasEYES eye brightener for the inner rim that comes in the set, too.

Tarte Smooth Operator Illuminating Serum
Copyright Tarte Cosmetics.  Photo from the Sephora website.


Another product from the Sephora Glitz & Glam collection that I fell in love with is the Lorac Perfectly Lit in Spotlight.  It's a tan bronzer like product that has a bit of shimmer to it that adds a beautiful glow for sculpting the cheekbones on fair skins.  I brushed it on the back of the cheekbones and up to the temples and then used a very sheer bright pink on the apples of the cheeks to help them "pop".  It was a beautiful combination that gave them a gorgeous glow without looking like they were wearing a ton of blush. 

Since I'm going on and on about the great stuff I got from Sephora recently (and that I tried out at the wedding this Saturday) I'll also let you know about Tarte's Good As Gold Lipgloss Collection (for only $29!!!!!).  It is absolutely going to become a staple in my kit.  The glosses are the perfect size, the price is amazing, and the colors are to die for.  I used some of the brighter pinks on the lips blended over a brownish nude lipliner, and it was the perfect compliment to the bronze/pink cheeks of the bridesmaids.  Paired with shimmery nude and chocolate colored eyeshadow and glitzy copper liner, it was a soft romantic effect that went perfectly with the deep chocolate colored bridesmaids dresses.

I ordered a few more collections from Sephora with my discount today, and I can't wait to get them in and tell you all about the awesome products inside!
Related Posts Plugin for WordPress, Blogger...