Showing posts with label YouTube. Show all posts
Showing posts with label YouTube. Show all posts
Wednesday, June 5, 2013
How to Reuse False Lashes
It’s perfectly ok to reuse false lashes (ONLY ON YOURSELF, NEVER REUSE LASHES THAT HAVE BEEN WORN BY ANOTHER PERSON- AVOID CONTAGIOUS DISEASES PLEASE!) to get the most bang for your buck. Especially if you’re using high end brands. Watch as I show you how to remove your lashes properly, clean them, and then store them so they’re good as new for the next round!
Wednesday, May 29, 2013
My Favorite Ardell False Lash Styles
I've been a huge fan of the Ardell false lashes for years now. When it comes to my professional work, this is the brand that I reach for over and over. The majority of the styles that I've seen are still more natural looking than those with the big thick black plastic bands, because even if they are a thick crazy-ish style of lash the bands on the Ardell lashes are for the most part clear and easily hidden at the base of the real lashes. While it would be apparent that someone was wearing falsies due to the length, color, or thickness of the lashes themselves, they are still pretty naked to the eye at the base and blend beautifully with the person's real lashes.
I've put together a video showing you my favorite Ardell false lash styles that I use for my headshots and bridal work. These are also going to be the lash styles that I use on myself for the majority of my videos, unless I'm going for a more dramatic character makeup. Which honestly, I don't see myself filming until around Halloween time anyway. I'm more of an "everyday" type makeup YouTube-r. There are tons of videos out there demonstrating how to blend 18 colors of neon eyeshadow if you want to know how to do the really out there dramatic looks. But for the most part I make videos for women who come to me and say "I never learned how to do my makeup. Please help me!"
So if you're interested in wearing false lashes and want a brand that not only looks great but is also easy to find and super affordable, check out my recommendations for my favorite styles from Ardell. You can find them at Target, Walmart, Ulta, and Sally Beauty as well as many websites such as Madamemadeline.com. (Madamemadeline.com is where I prefer to buy mine, since there are tons of ways to get free pairs, free shipping, etc. Plus, when I buy them in bulk, they are cheaper than anywhere else I've found combined with the coupon codes. I think the code "Falsies" still gives you 8% off. I've been using it for years.)
Here's the styles that I recommend: #109, #110, #122, Demi Wispies, Demi Luvies, Demures. I'll also show you in the video what to look for in a good false lash, in case you can't get your hands on the Ardell brand.
Do you wear false lashes? What's your favorite brand/style?
Friday, May 10, 2013
Product Review- Real Techniques Makeup Brushes
Today's blog post is a little bit of a "cheat". Here's my latest product review video for YouTube, where I talk about each of the different Real Techniques makeup brushes and how I like to use them. I could go on and on in the blog about how freakin' amazing these makeup brushes are and how much I love them, but I think for something like this a "show and tell" method gets the message across so much more nicely.
 |
| You can see the Real Techniques makeup brushes mixed in with my other brands... ready for a wash on a Friday night! |
I think I own probably about 300-400 brushes. I have tried every line out there at some
point, and none have impressed me as quickly as the Real Techniques makeup
brushes. I apologize that this video is
kind of long, but 1. Let’s be honest here, we all know I’m a chatty Cathy, and
2. I own I think every brush they make.
So there’s a lot to go over. Hope
you enjoy it.
Products Used or Shown:
Real Techniques Buffing
Brush
Real Techniques Essential
Foundation Brush
Real Techniques Pointed
Foundation Brush
Real Techniques Detailer
Brush
Real Techniques Foundation
Brush
Real Techniques Contour
Brush
Real Techniques Blush Brush
Real Techniques Multi-Task
Brush
Real Techniques Stippling
Brush
Real Techniques Setting
Brush
Real Techniques Deluxe
Crease Brush
Real Techniques Base Shadow
Brush
Real Techniques Accent Brush
Real Techniques Brow Brush
Real Techniques Pixel Point Eyeliner BrushWhat do you think? Would you or will you buy these brushes? Have you tried them already? How do you feel? Let's get some feedback!
**Update*** 10/23/13: These brushes are now available online at Target.com and inside your local Target stores!
Tuesday, April 30, 2013
Makeup Tutorial- Jessica Alba Kid's Choice Awards Look
Before I moved I filmed about 10 videos I'd planned on uploading once a week or so while we waited for the new house to be finished being built. (Seems like my whole life is revolving around this house right now! I can't wait for it to be finished so I can get my studio all set back up again finally. I feel like my life is incredibly boring without meeting with clients every day lately.) But then we moved, and I couldn't find the cords for my computer. All the videos were on the hard drive, and now that I've finally gotten it all back together I can pull those files off an upload them! Yay!
Here is the first of my celebrity tutorials- Jessica Alba from the Kid's Choice Awards. It's a gorgeous glowing look (I mean seriously, is she ever not glowing and gorgeous?) with soft rosy cheeks and beautiful deep teal eyeliner. I added a bit of sparkle with a line of glitter eyeliner over the top, just for a pop of fun. I really hope you enjoy it! Teal liner is really really in for summer, and although this is a bit more on the emerald end, you can definitely switch it up with a more blue shade.
What trend will YOU be rocking this summer for a hot date?
Products Used or Shown:
Elf Blushed and Bronzed
Clinique Blush in New Clover
Stila Waterproof Liners in Peacock and Starfish
Stila All Over Shimmer Liquid Luminizer
NYX Glitter Liner in
#110 Crystal Jade
MAC Eyeshadows in Orb, Gesso, and Kid
Bite Beauty Lipstick in Musk
Victoria Secret Lipgloss in Mocktail Hour
L’Oreal True Match Lumi Foundation in W 1-2
You can view my other videos here:
HOW TO APPLY
FOUNDATION WITH A BEAUTY BLENDER STYLE SPONGE-
http://www.youtube.com/watch?v=fOS4HMvHzWI
HOW TO
POWDER UNDER YOUR EYES- http://www.youtube.com/watch?v=wXUVN7duRbo
HOW TO APPLY
POWDER TO SET YOUR FOUNDATION- http://www.youtube.com/watch?v=RDatlnwGArs
HOW TO
CONTOUR AND HIGHLIGHT YOUR FACE- http://youtu.be/6syRC94ex7I
HOW I FILL IN MY EYEBROWS- http://youtu.be/M7TENQirOLI
Thursday, April 4, 2013
Beauty Subscriptions First Monthly Review
For about a year I got the Birchbox every month, and although I loved the concept, I wasn't exactly always thrilled with the contents. I've got a little ferret stash going of unused samples in my studio, but they did make good giveaways for clients and other unique little thank you gifts. My credit card got lost when I was on vacation back in February, and since it was auto-billed to that card every month, I never got one for March. I figured it was the perfect opportunity to see what else was out there. I never knew there were so many options out there!
I picked about five, and so far three have come in for the month. IPSY and BeautyBox5 should be here mid to late April I believe. I have received my boxes from Beautyfix, Glossybox, and Beauty Army. Here's a rundown of each program and what was in this month's box.

Beautyfix: The most expensive per box at $49.99 I'm not sure if I'll continue this one. You don't get one every month. It's by "season", so a total of four times a year, and you can cancel at any time. Broken down into monthly increments, it's about the same as what I'd be paying for a cheaper monthly subscription. They say the value is up to $400 per box. You choose your products, so you really get to control how much your box is worth. My first one came with a bag and eight samples. The products you get to choose from are either full size products or deluxe size samples. They aren't cheap brands, either. For my first box, I chose:


Beauty Army: This one is only $12 a month. I think the only thing that was full size was the mascara from mark. But it's a relatively small size anyway (they are meant to be portable), so it's not as full of "value" as the Beautyfix box. It's a really cute packaging though! A nice sturdy pink box (with super cute pink camo print on the inside) I can see me using these each month for storing and organizing my samples/makeup.


Wow! I had a lot to say about these! What are the boxes you subscribe to? If you don't would you consider any of these boxes based on my reviews? I'd love to hear your feedback below!

I picked about five, and so far three have come in for the month. IPSY and BeautyBox5 should be here mid to late April I believe. I have received my boxes from Beautyfix, Glossybox, and Beauty Army. Here's a rundown of each program and what was in this month's box.

Beautyfix: The most expensive per box at $49.99 I'm not sure if I'll continue this one. You don't get one every month. It's by "season", so a total of four times a year, and you can cancel at any time. Broken down into monthly increments, it's about the same as what I'd be paying for a cheaper monthly subscription. They say the value is up to $400 per box. You choose your products, so you really get to control how much your box is worth. My first one came with a bag and eight samples. The products you get to choose from are either full size products or deluxe size samples. They aren't cheap brands, either. For my first box, I chose:
- Full sized lip gloss in Pink/Ava. The brand is called Skylark by Elle & Blair. Never heard of them before, but the gloss is nice and creamy and very pigmented. Could stand to have a scent/flavor to it, since it's on your mouth all day. It's not a very nice smell at all. I like the color though, and it doesn't feel too sticky.
- Full sized 24-Karat Gold Dust Shimmer Powder by Jane Iredale in Rose Gold. Not sure how I'll use this, as it's really pink for my eyes, but it looks a little too sparkly for my cheeks. I'm going to play around with it some more and see how it goes. I plan on doing a review for each of these full sized products later in the month after I've played around with them some more.
- Amlactin Ultra Triple Action Alpha-Hydroxy Therapy Hydrating Body Cream. Whew. A mouthful. But I love Amlactin for my keratosis pilaris, and this is a nice small size I can toss in my purse.
- Arcona Cranberry Gomage. According to the sticker, this is a Best of Beauty Allure Award Winner for 2011. I already LOVE the scent, and anything that purifies the pores is a winner in my book, too. I'm looking forward to trying this out when I'm done with my new skincare routine.
- DDF Amplifying Elixir- It's a half-ounce size, so it's a little more than a quarter of the full size product, which retails for $75. A decent size, so it will give me enough uses to determine if it's worth purchasing. I love that the samples are so big. Not just a little single use. For skincare, you really need to use things for at least a week to see any benefits!
- Bliss Triple Oxygen + C Energizing Cream. I've been wanting to try this brand for a long time now, so I was excited to see this on the list.
- Oxygenetix Oxygenating Moisturizer. I know nothing about this stuff, but the label makes it sound good. It's a pretty decent size (30ml), so I'm planning on using this all up and doing a full review in a few months.
- Peter Thomas Roth Lashes To Die For The Mascara. Not excited by the rubber wand. I'm usually not a fan of those. But if this stuff can help my lashes grow, I'll buy the full size!
 |
| Here's a swatch of the pigment and the gloss. |

 |
| I love how when I opened it up, the first thing I saw said "Hello Gorgeous". |

Beauty Army: This one is only $12 a month. I think the only thing that was full size was the mascara from mark. But it's a relatively small size anyway (they are meant to be portable), so it's not as full of "value" as the Beautyfix box. It's a really cute packaging though! A nice sturdy pink box (with super cute pink camo print on the inside) I can see me using these each month for storing and organizing my samples/makeup.
- Not Your Mother's She's A Tease Volumizing Hairspray. A great 2 oz size, I can toss this in my makeup kit or purse without taking up too much room. Or with me on my travels, which I anticipate there being many more of this year with me leaving the wedding industry and having my weekends back!
- Mark. Scanda-lash Hook Up Mascara. Also came with whatever they call the little snap piece in the center you pop your glosses/mascara/etc in and out of to make your own custom duo ended beauty product.
- Whip Hand Cosmetics Limited Edition Loose Pigment Shadow in Green Beret. This is the cutest little sample that I've ever seen. Seriously. It looks like it could be in Barbie's makeup bag. The color looks cool though.
 |
| This is next to a MAC eyeshadow pan. Yup, it's that itty bitty! |
- Lash Card two pack sampler. It's a cardboard card you put over your eyelid so that your mascara doesn't get on your lid. I have to admit, I have this problem all the time right at my lashline, which is why I always wear liner (it gets hidden). But I'd never pay for cardboard cover ups. Not sure if I'll ever try them out or just include them in some kind of giveaway.
- Yes to Carrots Nourishing Super Rich Body Butter foil packet. Probably enough product to cover my hands and that's it. But it will at least give me a feel for the product, and if I like it maybe I'll pick up a real size at Target sometime.
- Advanced Essentials skincare sample foil packets. One is a serum and the other a moisturizer. Doubt I'll even open these, as a single application is almost useless for skincare for the face. It's not going to inspire me to change from what I already have.

- Ying Yang soap bar from Prestiche. It's got "dead sea mud and salt with shea, eucalyptus, tea tree, frankincense, and a pure blend of beneficial oils". It smells lovely. Reminds me of walking past the Lush store at the mall. I'm looking forward to using this in the shower, or maybe giving it to my husband to use. It's got more of a manly type scent than girly. I'm a fan of fruity or sweet smells on me personally.

- $40 gift certificate to Prestiche.com. This was what really blew me away. $40?! Wow! That's twice the value of the box subscription on top of all the samples. And with how good the soap smells, I'm excited to order some more from the site. I'll do a review of the soap itself along with the other products when I get them in and have had time to review them.
- Model Co Cheek + Lip Tint in Rosy Red. Not sure why it's called rosy red, as it's a fuschia color, but it's a really big size! I looked it up on Amazon.com, and the full size is .28 fl oz for $27.31. The Glossybox size was .33 fl oz! So it's more than full size!
- Sebastian Shaper Fierce hairspray. Travel size, but this stuff is awesome. Even the small travel size cans are at least $3-4 in stores.
- Pixi Lid Last Shadow Pen in Brun Beam. A really nice matte grey-brown shadow crayon.
- Elite Paris Matt Liner in Matt Brown. Gorgeous liquid liner with a nice felt tip applicator. SUPER pigmented. I can't wait to try this out!
- And because I used the code found in the Glossybox Banner (below and at the top of the blog) I got a free nail polish from OPI. It's a textured polish, which I've never tried before. The color is called Can't Let Go, and it's a really beautiful purple with glitter and shimmer. It's one of their "Liquid Sand" polishes, and I can't wait to swatch it for you!
Wow! I had a lot to say about these! What are the boxes you subscribe to? If you don't would you consider any of these boxes based on my reviews? I'd love to hear your feedback below!
Why You Should Follow Me on YouTube
Why should you follow me on YouTube? Let me tell you why...
#1. It's free. And it takes like two clicks. Click HERE to go to the channel, and then find the Subscribe button. Click that. There. Done, and it didn't cost you a thing. Now you have instant access to my wealth of knowledge on all things beauty.
#2. I actually know what I'm talking about. I'm not going to teach you how to burn your hair off, give you purchasing advice bought off by the makeup companies, or give you tricks that could cause serious sanitation issues. I know what works not only my skin tone and shape, but on the skin tones and shapes of the endless clients that I work with day in and day out. Anything I recommend, I'm going to do so, because it works. I don't talk about anything I haven't test run on myself or others first. Same goes for this blog by the way!
#3. I think I can be pretty funny at times, witty at others, and at my worst not drive you crazy with the sound of my voice. I'm not going to be crazy and wild and a "what will she do next" kind of girl, but I'll at least make your makeup education not boring. (And if you've watched YouTube as long as I have, you know that's not always the case for everyone out there!)
So if my words don't inspire you, check out my video above and see for yourself! Then make my day and make those two little clicks. Even if you never watch another of my videos again. Seeing those numbers go up does give me a warm tingly feeling inside! haha!
Want other ways to follow me? I'm all over!
Twitter: www.twitter.com/sueminskey
Instagram: www.instagram.com/sueminskey
Pinterest: www.pinterest.com/sueminskey
Facebook: www.facebook.com/facesbysammakeup
And of course on Bloglovin and SheSaidBeauty!
Friday, March 29, 2013
Top Beauty Apps
Just about everybody has a Smartphone these days... or an iPad, or an iPod that's basically an iPhone (minus the phone calls!). This past week I've been test driving some of the top beauty apps available. (And by "top" I mean the top ones that showed up by relevancy when I typed in beauty. Read below for why some of these don't earn top ratings in my book.) Now, these were on my iPad, so they are from the iTunes store. Not sure their availability for Android phones or tablets, but you can check out my Winners below and see for yourself on your system.
The Losers-
1. Modiface Makeover: 1 Star. This app is supposed to allow you to test run different makeup products on a photo of your own face to see how they would look. The concept is solid. You take a photo of your own face and then can do test swatches on your actual features with buyable makeup products. However, what it has in theory it lacks in application. The colors are really sheer, so it's hard to say for sure if that's how the pigmentation will really look on you. It's ultra unrealistic looking. I tried out lipstick colors, and it didn't even overlap me lips. It tried to, but there was on predetermined lip "shape" that is superimposed over my mouth. It looked kind of like a child's crayon drawing. There's also the Makeup (what the difference is supposed to be beats me) and Nails versions, but this was so bad I deleted them without even trying them out.
2. My Beauty Bible: 1 Star. At first, I thought it looked really professional and user friendly in its layout. I was excited, but the free version is almost useless. There are only five videos, seven photos, and I didn't bother counting the text tips (which were ridiculously basic). They also make another app (which I didn't realize until I opened it, and it was almost identical) called How To Do Your Makeup Professionally. There were even LESS videos supposedly in the paid version than My Beauty Bible. And they aren't even professionally produced photos by actual makeup artists. They are imported videos from YouTube. Why people would PAY to have access to these when you can see them for FREE on YouTube is beyond me. Color me annoyed.
3. BarryM Looks: 1 Star. I was excited to see this, because I've heard such good things from other YouTuber's out there about the BarryM products. Having seen them in action, I thought they looked to be great quality. Apparently though, that doesn't translate to their app quality. It looks like a 6th grade powerpoint presentation, with outdated graphics. The videos have no voice and are very ameteurish with low quality resolution and lighting. It's ok if you want to see how the products work, but they even show the quality of the products off well at all. It looked like bad Wet N' Wild makeup from 1989. They look super cheap.
4. How To Make Your Hair Look Fab: 1 Star. By the makers of My Beauty Bible. Enough said.
5. Mark.trends: 2 Stars. This app is basically an ad for their new products. Like an Avon catalog with 8 pages you flip through on an iPad. You can get through it all in a matter of minutes. But I gave it an extra star, because it does look really nice and professional. Just with there was some interactive elements to it that made it engaging!
The Winners-
1. Beauty School by Typef.com: 4 Stars. This app is great for beginners at makeup! You input your personal traits (like hair color, skin color, skin type, etc) and select mini courses to show you basic application techniques. You get written step by step instructions, videos, and product recommendations. It's like all your basic beauty articles from a magazine in one place. I recommend it if you are looking to start wearing makeup everyday (for work, etc) and need some guidance, or for young girls just starting to experiment passed lipgloss and mascara.
2. Beautylish: 5 Stars. The winner by far, I love this app. I've started using it a bit more on my actual computer through the website, but it allows me easy access to my account when I would rather work from the couch! You can upload your own videos and connect to your YouTube account then link to the products you used. It gives your audience instant buying power! There's an online retail store, so they can purchase everything there all at once. It's great for those people who don't want to have to search everywhere for the products used in their favorite tutorials. You can also write and read reviews on hundreds of products, and there are awesome forums where you can chat with makeup and beauty enthusiasts from all over the globe! Plus, you get $10 store credit for joining. All for FREE. (Keep in mind though that the credit is good for only 48 hours.) I've already had a great time connecting with people and sharing my opinions.
The Contenders-
1. Celebrity Makeup Looks: 3 Stars. It's basically full of YouTube tutorials featuring how to's on celeb looks. Again, another app trying to feed off of YouTube's gurus to create their product. The ads at the top of the page are distracting from watching the videos, and there's no way to get rid of them. The description bar doesn't open fully, and you can't read much at all. However, there are links that connect you to that guru's YouTube account, so you can subscribe and watch their videos through YouTube at a later time. It's a decent concept, narrowing down the focus of the videos into one place. But again, it's really just using the work that YouTube has done to create it's own app.
2. Bloom Beauty Trends: 3 Stars. This is a good place to promote yourself or finding a professional near you, but I didn't see many members near me. I can see this becoming a big thing in the future, as more pros join and it becoming a great resource. But it's really no more useful than YouTube itself. You can find someone's profile and see their tutorials and education/references in one place though.
Do you have any favorite beauty apps that you'd like to recommend? I'd love to hear about them! Please leave me a comment below!
 |
| I also learned that some of my top beauty magazines have online subscriptions for free I can easily add to my newstand in iTunes. No more toting heavy magazines with me everywhere! Yay! But I can't exactly dog-ear the pages for reference though. :( |
The Losers-
1. Modiface Makeover: 1 Star. This app is supposed to allow you to test run different makeup products on a photo of your own face to see how they would look. The concept is solid. You take a photo of your own face and then can do test swatches on your actual features with buyable makeup products. However, what it has in theory it lacks in application. The colors are really sheer, so it's hard to say for sure if that's how the pigmentation will really look on you. It's ultra unrealistic looking. I tried out lipstick colors, and it didn't even overlap me lips. It tried to, but there was on predetermined lip "shape" that is superimposed over my mouth. It looked kind of like a child's crayon drawing. There's also the Makeup (what the difference is supposed to be beats me) and Nails versions, but this was so bad I deleted them without even trying them out.
2. My Beauty Bible: 1 Star. At first, I thought it looked really professional and user friendly in its layout. I was excited, but the free version is almost useless. There are only five videos, seven photos, and I didn't bother counting the text tips (which were ridiculously basic). They also make another app (which I didn't realize until I opened it, and it was almost identical) called How To Do Your Makeup Professionally. There were even LESS videos supposedly in the paid version than My Beauty Bible. And they aren't even professionally produced photos by actual makeup artists. They are imported videos from YouTube. Why people would PAY to have access to these when you can see them for FREE on YouTube is beyond me. Color me annoyed.
3. BarryM Looks: 1 Star. I was excited to see this, because I've heard such good things from other YouTuber's out there about the BarryM products. Having seen them in action, I thought they looked to be great quality. Apparently though, that doesn't translate to their app quality. It looks like a 6th grade powerpoint presentation, with outdated graphics. The videos have no voice and are very ameteurish with low quality resolution and lighting. It's ok if you want to see how the products work, but they even show the quality of the products off well at all. It looked like bad Wet N' Wild makeup from 1989. They look super cheap.
4. How To Make Your Hair Look Fab: 1 Star. By the makers of My Beauty Bible. Enough said.
5. Mark.trends: 2 Stars. This app is basically an ad for their new products. Like an Avon catalog with 8 pages you flip through on an iPad. You can get through it all in a matter of minutes. But I gave it an extra star, because it does look really nice and professional. Just with there was some interactive elements to it that made it engaging!
The Winners-
1. Beauty School by Typef.com: 4 Stars. This app is great for beginners at makeup! You input your personal traits (like hair color, skin color, skin type, etc) and select mini courses to show you basic application techniques. You get written step by step instructions, videos, and product recommendations. It's like all your basic beauty articles from a magazine in one place. I recommend it if you are looking to start wearing makeup everyday (for work, etc) and need some guidance, or for young girls just starting to experiment passed lipgloss and mascara.
2. Beautylish: 5 Stars. The winner by far, I love this app. I've started using it a bit more on my actual computer through the website, but it allows me easy access to my account when I would rather work from the couch! You can upload your own videos and connect to your YouTube account then link to the products you used. It gives your audience instant buying power! There's an online retail store, so they can purchase everything there all at once. It's great for those people who don't want to have to search everywhere for the products used in their favorite tutorials. You can also write and read reviews on hundreds of products, and there are awesome forums where you can chat with makeup and beauty enthusiasts from all over the globe! Plus, you get $10 store credit for joining. All for FREE. (Keep in mind though that the credit is good for only 48 hours.) I've already had a great time connecting with people and sharing my opinions.
The Contenders-
1. Celebrity Makeup Looks: 3 Stars. It's basically full of YouTube tutorials featuring how to's on celeb looks. Again, another app trying to feed off of YouTube's gurus to create their product. The ads at the top of the page are distracting from watching the videos, and there's no way to get rid of them. The description bar doesn't open fully, and you can't read much at all. However, there are links that connect you to that guru's YouTube account, so you can subscribe and watch their videos through YouTube at a later time. It's a decent concept, narrowing down the focus of the videos into one place. But again, it's really just using the work that YouTube has done to create it's own app.
2. Bloom Beauty Trends: 3 Stars. This is a good place to promote yourself or finding a professional near you, but I didn't see many members near me. I can see this becoming a big thing in the future, as more pros join and it becoming a great resource. But it's really no more useful than YouTube itself. You can find someone's profile and see their tutorials and education/references in one place though.
Do you have any favorite beauty apps that you'd like to recommend? I'd love to hear about them! Please leave me a comment below!
Monday, March 18, 2013
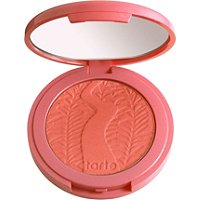
Product Review- Tarte Amazonian Clay 12 hr Blush

Amazonian Clay 12 Hour Blush
From the company:
A long-wearing, supremely soft blush infused with Amazonian clay harvested from the banks of the Amazon River and naturally baked by the sun.
Product Performance: This 12-hour blush universally
benefits all skin types for a fade-free, flawless finish in shades
ranging from soft to vivid and matte to shimmer to suit a wide variety
of skin tones.
Powered By: Amazonian clay minimizes oil in and around pores to balance skin and keep product in place while also hydrating the skin naturally to restore moisture, reducing the appearance of dry, flaky skin.
Powered By: Amazonian clay minimizes oil in and around pores to balance skin and keep product in place while also hydrating the skin naturally to restore moisture, reducing the appearance of dry, flaky skin.
And now for my $.02:
Let me start off by saying, nobody from Tarte paid me or asked me to do this review. I bought their Amazonian Clay 12 hr Blush in Blushing Bride last fall all on my own, with my own dollars. I bought another kit from them that had a travel size of a color called Adventurous (which I will cry when I run out of b/c they don't sell it on it's own!).
 |
| Copyright Tarte Cosmetics. This is a screenshot from their website of the Blushing Bride Color. |
That disclaimer out of the way... I LOVE THIS BLUSH! I really love the Adventurous color a lot better than the Blushing Bride color, but it's still a really great product and can be totally wearable even on my super pale skin. When I want a more mauve/wine based color for a bit more drama, or I'm wearing cooler tones for my outfit and makeup but don't want to reach for a really Barbie-pink color, the Blushing Bride looks great. I love how it has some soft golden shimmer to it. However, Adventurous is way more my speed- the perfect blend of peachy pink with a non-glittery glow.
 |
| Click to shop |
The 12 Hour Claim:
I find that this product goes on beautifully and really holds up to it's claim of 12 hours of wear. It actually lasts longer than that on me, as I am often putting on my makeup in the wee hours of the morning for weddings and hitting the hay after midnight. Can't say I'm totally stunning at that witching hour, but it's definitely better than 12 hours. I do wear a high quality foundation (most times over a high quality makeup primer like Makeup Forever HD Primer), so I'm sure that helps with staying power vs applied over cheap foundation or just a powder. No matter how good a product is, you have to give it something to grip to!
 |
| Copyright Makeup Forever from the Sephora website. |
My favorite thing about these blushes, other than the fact that they wear so well, is that the case color matches the product color. Ingenious! I don't know why more cosmetic manufacturers don't do this! It's really such an amazingly simple idea, yet it makes it so nice for when I'm looking for exactly the color I want.
Watch my YouTube review video for more about why these blushes rock! Looking to add some Tarte products to your makeup bag? SHOP HERE and don't forget to sign up for their Pretty Perks program to earn great rewards for shopping online and FREE SHIPPING on orders of $40 or more!
Saturday, March 16, 2013
How To Contour And Highlight Your Face
For this tutorial, I used powder products to contour (add shadows) and highlight (bring forward) my face. I like using powder products, because I prefer to set my foundation after applying with a loose hydrating powder. My favorite is Smashbox Halo Hydrating Perfecting Powder. You could use a cream or liquid product to add your contour and highlight prior to your foundation for a more natural look or after the foundation for a stronger look and then add your powder over the top.
Products Needed:
*Too Faced Chocolate Soleil Bronzer- a matte dark bronzer with a delicious chocolate smell!
*Stila Eye Shadow in Kitten- careful this color is very very shimmery so use sparingly!
*Real Techniques Contour Brush
*Real Techniques Setting Brush
*Crown Brush IB106 Angle Blush Brush- from their Italian Badger line
Step 1:
* After you apply your foundation (watch how I apply it with a Beauty Blender™ style sponge here!), concealer, and powder, dip your angled blush brush into the bronzer and apply it under the cheekbone from the back of your cheek forward. Stop it just below the apples of your cheeks. Repeat on the other side. (Check out the video to see how I hold the brush and how to find where the perfect placement for your contour shade.)
Step 2:
* Using your angled blush brush, apply the bronzer at the temples and along your hairline to give some dimension to your forehead. This will make the center of your forehead look brighter without having to apply a shimmery highlight in your t-zone, which could make you look oily or shiney in photos.
 |
| Copyright Too Faced Cosmetics. Image from the Sephora website. |
Step 3:
* (Optional) Using the setting brush, apply bronzer in a narrow line down the sides of the nose to make it appear thinner. Be sure not to take it all the way to the tip of your nose, or it could look dirty. Blend it out very well so it's just the hint of a shadow and not a dark obvious line.
Step 4:
* Swipe the contour brush over Kitten and tap the excess. Apply the highlight over the top of your cheekbones from just before the temples to just over the center of the apples of your cheeks. Do this for both of your cheekbones to highlight.
Step 5:
* Without adding any more product to the brush, swipe the brush in a "C" shape over the outer edge of your eyes to bring a touch of radiance to your eyes and really bring out this area of your face.
Step 6:
* Use your setting brush to get a very tiny bit of Kitten on the tip of the brush and swipe it down the center of your nose and over the bow of your lip. Make sure to blend away any edges with your fingertip so there is no obvious makeup here. You just want it to catch the light a bit and add a glow, not a frosted stripe.
Step 7:
* If you need to tone down any of your contouring or hightlighting, use your buffing brush to soften the edge with a bit of your face powder.
Step 8:
* Don't forget to add some color to your cheeks! Even if you don't want a real "pink" or "peach" color to your face, you should use a blush to blend the area between the highlight and the cheekbone together. You can always try a very nude color with a hint of brown to it for a very "no makeup" look, but honestly I prefer something with a touch of pink. Nobody's face is completely devoid of natural flush, so eliminating it has the tendency to make it look very unnatural.
Subscribe to:
Comments (Atom)